Follow Me on Pinterest
Powered by Blogger.

Thursday, November 8, 2012

Wreaths

I love to make wreaths!  I started making them about 5 years ago and only recently started selling them.  I would make them for family/friends and everyone kept telling me "you should sell these" so I started selling them!  The pictures below are the most recent ones that I have done.  I hope they inspire you to create your own beautiful wreath!


Monday, October 15, 2012

Best Gluten Free Snack EVER!!!

My favorite snack (could be a dessert!) as a child was puppy chow.  If you don't know what puppy chow is, it isn't dog food!  It is chex cereal, chocolate, peanut butter and powdered sugar heaven.  Just warning you that you can't just eat a little so if you make this be prepared to eat alot of it.  I usually ask my husband to hide it so I won't eat all of it!  Because we are a gluten free, diary free, egg free and peanut free family I had to adjust the recipe. 

You can find a basic recipe on the back of a corn Chex cereal box and adjust for whatever your dietary needs are.  You can also use the rice Chex.

  • 9 cups of corn or rice Chex cereal
  • 1/2 cup of Sunbutter (you can use any peanut free alternative or the real thing if you are not allergic to peanuts)
  • 1/4 cup of non-dairy butter (I use Smart Balance)
  • 1/2 cup of non-dairy chocolate chips
  • 1 tsp Gluten Free Vanilla extract (you can omit if you don't have any)
  • 2 cups of powdered sugar (you can use less if needed, I just like a lot of powdered sugar on mine!)

First thing to do is measure out your 9 cups of cereal and set aside.  Now, place one cup of the powdered sugar in the gallon size zip lock bag.  Next, put Sunbutter, non-dairy butter and chocolate chips in microwave safe bowl.  Melt in microwave for 30 seconds and stir.  Place back in microwave and heat for 20 more seconds.  Keep heating at 15 second intervals until the mixture is completely melted and smooth.  Once the chocolate mixture is ready add the Chex cereal and stir well until all pieces of the cereal is covered with the chocolate.  It is messy but it is oh so good!


 Take a big spoon and scoop half of the chocolate covered cereal into the zip lock bag.  Seal the bag and shake until all of the pieces are covered. 


Place the sugar covered cereal on a cookie sheet to cool off.  Place the other cup of powdered sugar in the same ziplock bag and pour the other half of the cereal in.  Shake and then place the cereal out on the cookie sheet.  Cereal should be cooled off and ready to eat in about 30 minutes.  I put puppy chow in cute containers at Christmas time and give to teachers, administrators, office staff, etc.  Puppy chow can be kept in an air tight container in the fridge for up to a week.   

Monday, September 17, 2012

I LOVE Fall!!

I usually wait until the end of September to start decorating my front porch for fall.......but I was so excited that the weather has gotten cooler that I decided to decorate early!!  I already had a fall wreath made so I started with that on my front door.


I love adding mums to my front porch and usually don't buy them until the beginning of October but at Wal-mart they had them on clearance for $1.49.  That is a bargain I could not pass on!  I left the mums in the black container they came in but I covered the bottom with burlap.  Inside the burlap I added some clear plastic wrap so the extra water that falls out the bottom would not reach the burlap.  I bought the burlap at Joann's fabric store, cut out a square piece, wrapped it around the bottom and tied it off with some thin rope I already had.   I also made a Fall Blessings sign using a 12X24 piece of plywood and covered it with scrapbook paper and cardstock.  The decorative elements of the sign were cut with my Cricut machine.   With these 3 elements (wreath, mums, sign) I think my front door is simple but festive!


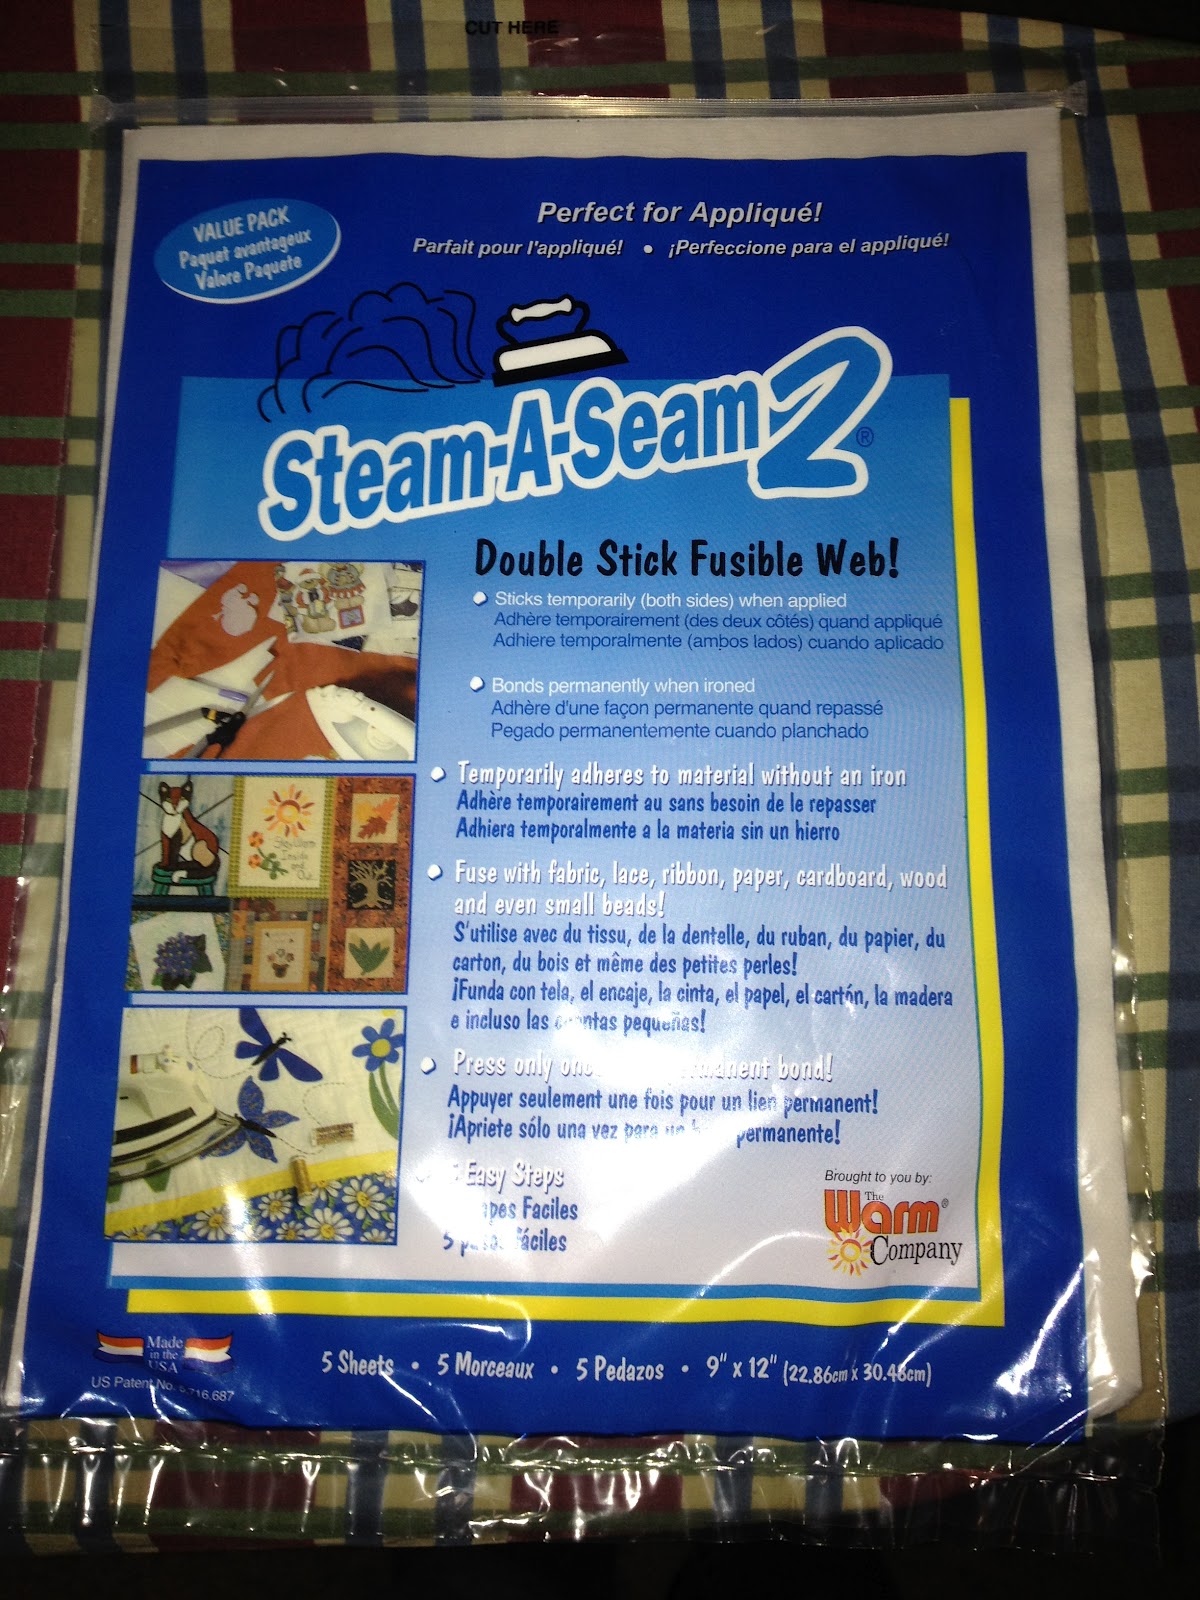
Of course I couldn't just stop there!  My porch is narrow but deep.  I have a whole other wall I can decorate!!  I have wanted a bench for my porch for sometime but being the bargain shopper that I am I would not pay over $20 for one.  I just happened to be in Garden Ridge about 3 weeks ago and they were selling their floor model.  It was on sale for $15!!  It only had one scratch on the paint....I can live with that!  And a bench is not complete without pillows.  I can't use a sewing machine (looking for someone to teach me if anyone is available!!) so I am always looking for ways to get around that.  I decided to use a dark brown burlap to make 2 pillows for my bench.  I used 3/4 yard of burlap(per pillow), pillow (18X18), fall material, buttons, Steam-A-Seam (found at Hobby Lobby) and hemp string (found in jewelry section of Hobby Lobby).  
I will be using the fall patterned material to make the center part of my pillow.  I cut an 8X10 piece of material and used the Steam-A-Seam to attach it to my burlap. 
 
 After ironing on the material to the burlap, I sewed on buttons in the corners and sides just to add more decoration and character to the pillow.
 I was now ready to use my hemp string to keep the pillow together.  Burlap is easy to make holes in so I used a pencil to make a hole and I pulled the string through.  It was like sewing without the needle...and of course the machine!  I did this all the way around in big sections.  You can make the holes closer together, I just  liked the look of having them farther apart.  When I got all the way around I just tied of the two ends with a knot.  I already had some burlap ribbon that I just tied around the hemp in one corner and made a bow.

 
 This pillow would definitely not last if used regularly but for decorative purposes only it will work!

Above my bench I wanted to put a chalk board.  I did not want to spend $50 for one so I decided to make my own!  I only spent $17 making mine!  I started with a large chalk board I found at Hobby Lobby on sale at 30 percent off.

 
 I wanted hooks at the bottom of my chalk board so I found small black hooks at Lowes for $1 each.
 I painted the frame of my chalk board with a dark Burgundy acrylic paint.  The large burlap ribbon will be used to hang the chalk board.
When I was done painting the frame and it was dry, my lovely husband used his sander to make the frame look distressed.  I then drilled 2 holes in the top and pulled my wide burlap ribbon through to make the hanger.  My husband also screwed in the hooks at the bottom for me. 

 
I think the frame turned out really cute!!!


My completed front porch.


Saturday, September 8, 2012

Luau! Gracie Turns 6!

My daughter wanted a Luau Party for her 6th Birthday.  Because her birthday was at the end of the summer, I was lucky enough to find most things on clearance!!  I love bargains! Some members of my family call me Black Friday because bargains just seem to find me. Very rarely do I pay full price for something!   All items were found at Hobby Lobby, Michaels, Dollar Store and Big Lots. 

I have to apologize for the pictures.  It hasn't rained where we live in about 40 days and the one day I need it to be sunny....it rains!  So we had to move the Luau inside our garage.  I hope you get some inspiration for your Luau Party!


Friday, August 31, 2012

Disney Pin Holder

What to do with all those Disney pins you got on vacation?  That was the question I had been asking myself since returning from Disney World in July.  My daughter wanted hers to hang on the wall while my son wanted to use his pin holder we purchased while at Disney.  After looking on-line to get ideas, I decided to do make a cute, girly cork board.  I bought a cork board at hobby lobby, some fabric to match my daughter's room and trim.  All items were on-sale last week!!  I covered the cork board with the fabric and used hot glue to attach it to the backside.  Next, I hot glued the trim around the edges.  I had some floral flowers I purchased at Garden Ridge for 90% off so I hot glued one of those in the corner.    For the hanger, I used hot glue to attach a green ribbon to the back side and tied a bow at the top.  All that was left was to add the pins!  I think it turned out cute and my daughter loves it!  The best part was that it took less than $10 to make:).


Wednesday, August 22, 2012

Gluten Free, Dairy Free, Egg Free Strawberry Cake!!


So I decided to try to make a strawberry cake last night.  I usually try to find a non Gluten Free recipe and make it Gluten Free but the cake mix I had on hand was already Gluten Free.  I stated in my original post that we are a Gluten Free family.  We also have to omit Dairy for myself and my daughter and eggs for myself.  So most things I bake are Gluten Free, dairy free and egg free.  I am also allergic to peanuts......so everything I make is peanut free!!


For the strawberry cake I used what I already had in the house.  I started with Gluten Free Bob's Red Mill Vanilla cake mix.  I bought it at Reasor's but you can also get it at Akins.  On the back of the package is the recipe for the cake.  I however can't use eggs so I added 1 tablespoon of egg replacer to the cake mix (no other ingredients added yet) and mixed it up well.  I also added 1 small container of plain applesauce (the small one's that my kids eat with their school lunches) or if you only have a large container of applesauce you would add 2/3 cup.  I used 3/4 cup of water instead of 1/2 cup.  After mixing all the ingredients together I mixed in the strawberries.

  •  1 package of Gluten Free Bob's Red Mill Vanilla Cake Mix
  •  1/2 cup of canola oil
  •  1 tablespoon of egg replacer (if you can eat eggs then use 3 eggs)
  •  1 small container of applesauce or 2/3 cup (omit if using eggs)
  •  3/4 cup of water (only use 1/2 cup if adding eggs)
  •  1 cup of chopped strawberries

I used a 10 inch baking dish but you could use two 8 inch pie plates and make a double layer cake or use a 9X13 pan to make a sheet cake.  I would think you could also make cupcakes!


This is what it looked like before I put it in the oven.


This is after baking about 40 minutes at 325 degrees.


I added fresh cut strawberries (mixed with sugar of course) and Healthy Top (dairy free topping found at Akins or Green Acres).  It doesn't look that pretty but it sure was good!!!

Monday, August 20, 2012

Welcome to Faith Love and Glitter!  My motto is Have Faith, Love Others, Add Glitter!  I enjoy making anything crafty especially wreaths.  I will post about wreath making, custom gifts, party ideas, and anything else I feel will help you find your inner creativity! 

My family is a Gluten Free family so I will post recipes, tips, products and more pertaining to leading a Gluten Free life!